Pages

Tampilkan postingan dengan label and. Tampilkan semua postingan

Rabu, 18 Januari 2017

Fits and Starts


BoatWithSides1
Originally uploaded by OzzyC.
After what seems like an eternity without doing anything on the boat, Greg and I finally got some time to work on it -- not much, but in such a major undertaking, every little bit counts. The biggest obstacle right now is the heat. Gregs garags isnt climate controlled, so with the latest heat wave weve been having, its easily over 100 degrees in the garage until late in the evening. This, naturally, slows the progress.

On Saturday evening, we finally test-fitted the sides of the boat. Though the photo doesnt show it well, the bottom of the boat sticks out a little bit over the sides, so were going to have to do a little trimming before we can stitch the hull together.
Read More..

Sabtu, 14 Januari 2017

Look What We Did to Our Nice Canoes


Boys Trip 2006 035
Originally uploaded by OzzyC.
Per our tradition, we took our boys trip over Memorial Day weekend. For several years we have been travelling staying in Nicolette Forest in northease Wisconsin, for a few days of whitewater kayaking. This year, we decided to get back to our roots and do some canoeing. Greg and I took things a step further, and rigged up the Nice Canoes we built a couple of years ago as a makeshift catamaran. Greg, being engineer-boy, calculated the dimensions, measured the sail, and determined where to put the various parts. It worked surprisingly well -- for one day. The boat was structurally sound, but anything that directly related to the sailing aspect was woefully under-engineered. Stay tuned for the complete story... its quite a ride.
Read More..

Jumat, 13 Januari 2017

forms lined up and stem transom screwed together

Had a handful of bronze screws left over so used these to screw on the stem and transom. 

the rest of the frames have now been set on the centerline and screwed to the saw horses with temporary braces.  I will add a few more braces prior to gluing the transom and stem permanently.

Yes.  It really will fit out the window on the back of the shop.
Read More..

Selasa, 10 Januari 2017

The Good and the Bad and the Good

The fairing and sanding continues. Greg read about a really neat idea that will likely save us countless hours of eyeballing, and in the end, provide us with a significantly more accurate finished product...

In my last entry, you saw the level that showed approximately how much filling we need to do. Well, Greg decided to wrap that level in plastic, run a strip of filler under where the level was, and then essentially mash the level into the filler and let things dry. After the filler dried, he removed the level, shaved down the excess epoxy and voila, he had a "rail" that gave us a guide for how much filler we need to use. By running a second "rail" down the center, and a third one down the other side, we had a rail system built, which will allow us to roll out a single, thick, accurate layer of filler and dramatically reduce the amount of sanding and fairing we will need to do. A stroke of genius!


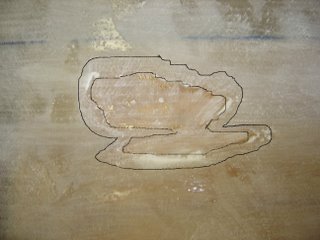
On the downside, when sanding yesterday, we came across a big spot that was starved for epoxy, as shown (and outlined) in the picture to the right. This is an area thats come back to haunt us from way-back-when. The area is approximately 4"X3." Its nothing that cant be overcome, but is a little frustrating.

We have yet to decide how to address the issue, but Greg has two ideas... one is to use fiberglass filler and epoxy, the other is to use glass micro-filler and epoxy. Ive found one or two other spots like this, but theyre small, in non-structural areas, and easy to fix.


Heres another small stroke of genius Greg ran across...

-Are you tired of constantly stirring epoxy and/or thickener?

-Are you working by yourself and would like to save a little time?

-Are you working with fast hardener, and tired of worrying if its going to kick too quickly?

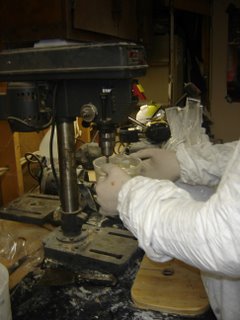
If any of these problems apply to you, then you should try what Gregs doing in this picture to the right. Use a drill (or drill press) and a paint-stirring bit to do the work for you. Its quicker and easier. Just remember to take measures to protect your drill. It would really suck if you ended ruining your drill because it got all gummed up with epoxy.
Read More..

Sabtu, 24 Desember 2016

Quick Heating and Quick Cooling


Heating the Glass Close-Up
Originally uploaded by OzzyC.
As mentioned in the last entry, we used a heat gun to heat up the stiff fiberglass, and soften the epoxy. Immediately upon softening, we laid a cool metal weight on top of the newly-softened fiberglass. This helped the fiberglass lay flat as it should.

As we went, we learned that we could run the heat gun in front of the weight, which would heat the fiberglass and epoxy, and we could immediately slide a weight behind the heated area. this would ensure the area would lay flat. Ive gotta say, it was a pretty clever trick.
Read More..

Kamis, 10 November 2016

Both stern and bow lights are burning bright! Hooray!


I completed the lighting, making only one gaffe. I knew I wanted the switch for the light to be on the upper port bulkhead. After installing the battery, and bus bar (2 bar type with positive/negative feeds), I wanted to install the switch where the wiring could be run as straight as possible. I know I am not supposed to run wiring at strange angles and tried my hardest to keep them running parallel course and making right angle turns close to panels. When I drilled the hole to mount the switch I accidentally chose a spot 1/4 inch thicker than the switch would mount into, thus creating a 3/8" hole in an otherwise pristine panel.
small divot above switch is where the panel is too thick. 


Ok, now what? Ah....the tube of grey sealant that I had just used to seal the hatches over the floatation would come in handy here. A smudge of it in the hole blends in nearly perfectly. I then went an inch lower and put the hole in only the 1/2" ply. This is a very neat installation.
Read More..

Sabtu, 29 Oktober 2016

Sanding and Fairing and Building the Edges

Greg and I havent forgotten about you, this blog, or our project. Its just that we havent recently hit any milestones worth blogging about. As I mentioned in some of my recent postings, the part were on now is very long and tedious... not much worthy of a blog entry. Despite my lack of posting though, we have made significant progress, and its very close to the rate that I expected. This is largely due to Gregs work.

My family and I went to California for vacation recently, which prevented me from assisting Greg for two weeks straight. In all honesty, I suspected that very little would be done during my absence. (This is partially because much of what weve done to date is highly expedited by having two people working, and partially because I realize that I help keep Greg motivated.) But when I got back home, I was pleasantly surprised to find that Greg had made significant progress during my absence. While I was gone, Greg enlisted the assistance of our mutual friend Dan. Dan, thanks for your help while I was gone. I appreciate it, and I know Greg appreciates it.

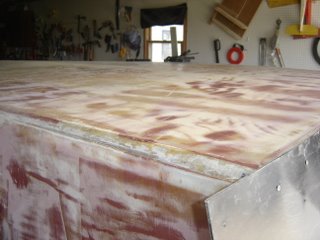
As you can see in the first photo, Greg and Dan made great progress in filling the bottom of the boat. Its very close to being finished.
Greg also made a lot of progress in rebuilding the hard edges of the boat. Remember, this boat is designed to have a planing hull, so a perfectly flat bottom and very hard chines are essential in order to have this boat perform as expected at planing speeds.

In the picture to the right, you will see how we made the chines with relatively little work. Greg screwed thick sheets of plastic to the hull, as shown in this picture. This gave us (when I say "us," Im including Dan, because he was part of this particular process; he also provided us with the plastic.) a fairly straight, and very sturdy platform with which to work. We wedged epoxy thickened with wood flour and fiberglass particles into the space between the plasic, going slightly higher than the bottom of the hull. This way, we were sanding down, instead of requiring a second fill coat.
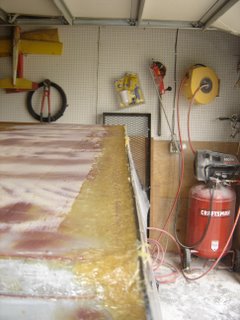
In this picture, you will notice the applied thickened epoxy. After the epoxy dries, we remove the sheets of plastic, and voila, a sturdy chine, ready for sanding.
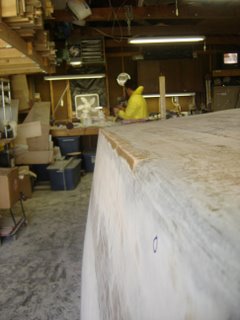


This shot will give you a basic picture of what the chines look like after the epoxy sets and the plastic is removed. What youre looking at is the starboard side. You will notice that the chines are not built up throughout the whole starboard side. This is because of the limited plastic available. It will require a second session to finish the side. You will also notice that we (again, "we" includes Dan) have been sanding and fairing along the entire bottom of the hull.
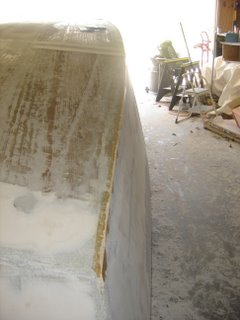
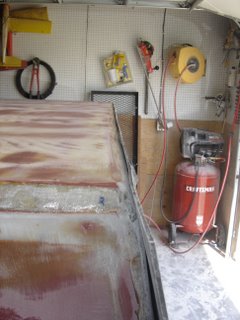
This final picture is taken from the bow, starboard corner. You will notice that Greg has also filled the front transom area, and the front bottom area, to compensate for the three-to-six layers of fiberglass. You will also notice the fair amount of fairing done on the bottom, and the hard chine. Like Ive said, its not that we havent been working, and its not that weve forgotten about you. Its mainly that were at a relatively tedious section of the project, and theres not a lot to report. After all, how many times can I say "Yep, were still sanding" and keep you all interested?

Until next time...

Oh yeah, you may have noticed that the boat has several different colors of filler. This is because Greg is utilizing a combination of whats cheapest and what works best for sanding and fairing in a given area of the boat.
Read More..

Jumat, 14 Oktober 2016

Other Uses for Epoxy and Plywood Part II


Shower Repair 4
Originally uploaded by OzzyC.
In this picture, you see that I have installed the scrap plywood. the plyowood has been sealed with epoxy, so it should stay waterproof for until I truly remodel this bathroom. Ive screwed it all into place with waterproof screws, and you may see that Ive test-fitted a block of tiles.
Read More..

Selasa, 04 Oktober 2016

sanding seats and rowlocks

more and more sanding.  the interior was far easier to sand as there was no fiberglass cloth insided. 

I found some excellent #2 1X10 pine that works great for the seats.  My local lumberyard has wide planks of this #2 that is way better than anything of any grade seen at the big box stores.  I took the boat over to the local lake and fiddled with seat placement and rowlock placement using four C clamps as temporary Thole pins.  As indicated on the plans I went 1.5" aft for the seat and the rowlocks are 13.5" aft of the back edge.  The aft seat appears to be a bit wide as if it were 8.5" would act as a foot brace.  I wont tack this in place until I am sure, but at least I know where the rowing seat is going and will install the cleats that hold it in place tomorrow. 

I did find it interesting that no matter how much I thought I had got all the rough spots with sandpaper, there were a few I missed that became apparent once I got it out in the middle of the lake. 

More interesting to anyone reading this is that this boat rows very well!  It tracks straight as an arrow and gets up to hull speed easily even with the 6 1/2 oars I used rather than the 7 recommended by the designer.  I hope to get some paint on it this week and some photos soon. 

The finish work takes much longer than actually building the hull.
Read More..

Kamis, 29 September 2016

Foot and hand massage techniques Pijat untuk kebugaran

Dvd  Foot and hand massage techniques-Pijat untuk kebugaran
Badan yang dipijat yang semula terasa lelah akan menjadi segar setelah dipijat. Dengan teknik Pijat yang tepat juga dapat membantu adanya penyembuhan berbagai macam penyakit fisik. Tapi yang paling terpenting manfaat dari pijat sendiri adalah dapat membuat pikiran menjadi lebih rileks sehingga dapat menekan kondisi stress dan membantu penderita yang mengalami kondisi sulit tidur (insomnia).
Pijatlah badan anda atau refleksi kaki dan tangan anda, dengan begitu anda akan bisa fresh dan siap menghadapi pekerjaan dan aktivitas anda sehari hari dengan fit.
Tujuan pijat adalah membuat badan menjadi sehat. Secara singkat, pijat mempunyai sejumlah tujuan antara lain.
- melancarklan peredaran darah
- memberikan relaksasi pada urat dan syaraf
- memberikan kekenyalan pada otot,
- membantu pembentukan tonus yakni cairan yang dihasilkan dari kelenjar Thyroid, serta melancarkan metabolisme tubuh.
- Memberikan kenyaman serta kehangatan terhadap tubuh,
Pijat, bisa digunakan pada semua tingkatan usia. Baik anak-anak, maupun orang tua.

Berikut adalah paket dvd pijat 

Isi :
Video
Foot and hand massage techniques
Ebook bonus
Sport massage 1 of 3.
Harga paket Rp.50.000.-

Read More..

Selasa, 27 September 2016

An Afternoon at Sarles Marina and Annapolis Classic Watercraft

Inside the wooden boat shop at Annapolis Classic Watercraft the participants view the latest restoration project
Mr. George instr1ucts Jaquan on the proper use of a Japanese saw. A tool that will be used often in the construction of the Peace Canoe.
Viewing for the first time, a Peace Canoe from Chesapeake Lightcraft

A cool afternoon was spent at Sarles Marina where Mr. George introduce 5 of the participants in the boat building project to the Peace Canoe and many tools they will use through construction.
He specified the need for safety and then let all interested try out the Japanese saw. Finally, it was time to go into the wooden boat shop and warm up. While inside, owner Bill Donahue, showed the kids around and talked greatly about the restoration process from beginning to end.

This is what Jaquan thought about the afternoon, " I think it was very educational, because we learned about the tools well be using to build our Peace Canoe. I got to use the Japanese saw and I found it easy."

"We had so much fun as we were part of a demonstration that showed us how to use a Japanese saw," stated Maurice.

The Annapolis Maritime Museum and Box of Rain Foundation are thrilled to have George Smith leading this initiative. George shares a couple of his thoughts on the program. "Youth boat-building programs are about taking it to a new level. We want to see tools in our hands as we learn, build, and have fun, leading to life-tools of ingenuity and team work." George has enjoyed meeting participants of the program at both the SERC and Sarles afternoons, he believes there is a lot of potential in the group.


Read More..

Kamis, 22 September 2016

Back to our Regularly Scheduled Program

We laid some more glass yesterday, but Im going to digress a bit.

You may remember in an earlier post that we had a couple of spots where the fiberglass didnt adhere to the plywood. Our initial plan was to drill small holes in these areas and fill them with epoxy. Greg changed his mind. Instead, he cut out these areas with a knife, and filled it with a mixture of epoxy and fiberglass filler. My camera batteries were dead, so I dont have any pics of this, but I will attempt to get some pics posted soon.

After the fiberglass filling, we did a little last-minute sanding, and laid fiberglass on one side. Weve now got about two-thirds of the exterior completely fiberglassed. We still have one side, and both transoms to do, but that should go relatively quick. Of course Ill post pictures.
Read More..

Rabu, 21 September 2016

A Brief Diversion

You may have noticed a lack of recent posts about our boat project, and if you think its because we havent done anything lately, youre right. You see, its almost time for our annual boyz trip pilgrimage. Every year over Memorial Day, Greg, two of our friends from high school and I go on an extended trip. The trips have varied tremendously over the years... sometimes we do long, self-contained downriver canoe trips, sometimes we do whitewater kayaking, occasionally more than the "core four" of us will go. Our trips have varied from three days to a week, and we have hit too many rivers to count. We started out taking these trips over Labor Day weekend, but changed to Memorial Day a few years back when we figured out that the water levels are generally higher this time of year.

This year, we will be travelling to North-Central Wisconsin and doing a self-contained island-hopping lake canoe trip, utilizing the canoes we built a couple of years ago. To add to the adventure, Greg and I are temporarily converting our individual canoes into a catamaran sailing vessle. Were going to a brand new area, doing a variation on our trip that we havent really done before, and trying a new feat of engineering. This should explain the lack of progress on the main project. Weve been planning the trip, and working on the rig that will convert our paddle-powered canoes into a wind-powered catamaran.

If you’re interested in some of the history and stories from our various trips, here are a few links for you to check out…

From earlier posts in this blog:
How it all Began; A Quick Sidenote:
A Well-Deserved Vacation
Pictures of the Canoes


From posts on my other blog:
Commemorating a Practical Joke

Read More..

Jumat, 02 September 2016

Day 2 began at 10 30 AM and ended at 3 30 with a lunch break of course

Today, I laid out the bottom panels on both sheets one and two and cut out the plywood for frames 2, 4, and 9
??
batten in place and lines marked for cutting.
All the lines that were marked were cut out with the circular saw.  I find it best not to set the saw too deep.


saw is set to cut no more than 1.5 teeth deep.
???? ??The next step involves cutting out one half and using it as a template for the other half.  After cutting the lines are faired up with a small block plane and a Stanley surform.  This makes short work of it and keeps the operator warm on a winters day (its 20 degrees Farenheit today). 


The same process is used on the next piece of plywood to get out the forward halves of the bottom. 

One more piece of plywood left.  We start by ripping it down the middle and marking our straight edges from which we will be measuring.    From this piece we will get the sides, the transom, and one half of frame 6.   I will cut these out next weekend if time allows. 


panels in the workshop waiting for the sides to join them.  It is much warmer in here and thus better for gluing.


Read More..

Rabu, 24 Agustus 2016

SandedHull


SandedHull
Originally uploaded by OzzyC.
All of the seams are now sanded and rounded. Weve got a procedural question in to the gurus about taping the corners. Apparently, some people plane the hull where the seams are, and the result is a lot less sanding. Well let you know when we find out.
Read More..

Senin, 01 Agustus 2016

bow shed plans are in

The plans for the bow shed came in this past weekend.  It is a very straightforward, cost effective solution; and rather elegant to boot.  The big challenge is in finding 12 long fir strapping. 
Read More..

Selasa, 19 Juli 2016

closing in on it

I installed the cross braces at station 3 and 10 today.  Michalak says the one at 3 is probably optional, but I plan on keeping it as it might make a nice place to tie a temporary anchor or help tie it to the roof of the car. 

This is the bottom, zip tied in place.  I was using wire, but gave up after punching a few holes in my hands.  This is much more user friendly. 

The bow twist is a little difficult to get to lie flat.  From here it is nothing some filler (ok, lots of it) and glass wont hide.  This took a lot of patience and some easing the center seam with a hand saw.  I was just glad that I put the halfs together in the correct orientation.  That would have been annoying.  The zip ties work well.  I believe I can sand right over them and leave them inside the putty. 


Another view. 

I got a little too aggresive easing the center seam in the middle of the boat.  Once again, filler and sanding should hide it pretty good.  I am not looking forward to working upside down in here.

?
These 1/4" holes allowed me to use a larger size zip tie 8" long.  that really helped a lot with the assembly.  If I were to do it again, I would loosely join the two panels, secure the edges and do the final trimming on the centerline last. 
?
Read More..

Kamis, 30 Juni 2016

February 7th and 14th Boat Building Sessions


Tammy is able to hammer nails into place (top) after Maurice has drilled preparation holes (bottom).

During the February sessions each group worked on getting the chine logs adhered to their canoes. From their original groups they were broken down into 3 task groups. One group had the task of getting the seats ready, while the other two groups each took one side of the canoe to work on. They had to begin by measuring off equidistant spots as to where the holes would be placed in preparation for the hammering of many nails. During this activity many participants were able to use a power drill for the first time. The kids really felt empowered given the use of this tool. The progress they are making will allow for their canoes to take an actual shape during the March sessions.
Looking forward, the public is always invited to our session at the McNasby Building. Our next building dates are Saturdays March 7th and 14th. Also, if you are downtown the first weekend of May for the Annapolis Maritime Heritage Festival, keep an eye out for the participants painting their canoes as part of the Annapolis Maritime Museum booth.
Read More..

Rabu, 29 Juni 2016

death and taxes a sure thing

Well - progress slowed to a crawl when both my inlaws died 17 days apart this spring.  We are just now getting back to a normal routine around here.  The boat had to be moved from the garage to an outside location to make room for all the stuff from my inlaws apartment. 

Last week, I went had the Massachusetts Enviromental Police come and inspect the boat to ensure that it was indeed a boat, and that it was mine.  He assigned it a serial number that will eventually be part of a builders plate riveted to the hull.  The next step is to take that document with the serial number on it to the division of taxation along with all of my receipts from the build.  Interestingly enough, I had to still pay tax on the materials I purchased online out of state.  A whopping bill of $13.42.  Then, you walk across the hallway to the Division of Recreational vehicles to get your registration number (this is different from the serial number) that allows other people to see what state you are from and identify you from a distance.  The nice woman at the DRV selected MS 2009 DJ as my number.  I ask you, "How cool is that?" 
vanity hull numbers?

Paint is next.
Read More..

Jumat, 24 Juni 2016

Other Uses for Epoxy and Plywood

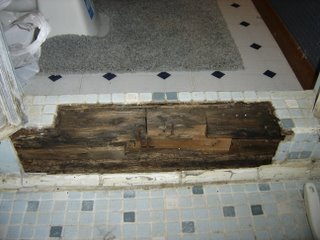
By now, were all familiar with using epoxy and plywood for building boats. But have you considered using plywood and epoxy for other jobs around the house? The previous owner of my house installed a tile shower, and used plain plain 2x4s and plywood for this water-catching lip. Over the years, water has gotten in here, and eventually it rotted away the plywood and the wood.

Im not going to the trouble of completely ripping this out and starting from scratch, but I am going to repair it so it stays put until Im ready to completely overhaul this bathroom. Enter the epoxy and plywood...

During the course of the next couple of weeks, I am going to epoxy the remaining wood, in an attempt to prevent any further deterioration. I will cut some scrap plywood to size and lay a protective layer of epoxy over that as well, which will waterproof the entire base. Finally, I will use thickened epoxy to stick the tiles back into place. Why epoxy instead of cement? Because I have the epoxy and plywood available. Id have to go out and buy the cement. The only reason NOT to use wood is because of the rotting factor. By coating it all with epoxy, I have removed the potential for rotting.
Read More..